Why Marble Wall Tiles Remain a Top Choice for Interior Designers
Few materials carry the same visual weight and lasting appeal as marble. Used for centuries in architecture and interior design, marble wall tiles continue to dominate premium residential and commercial spaces alike. But their enduring popularity isn't simply about aesthetics — it's about the combination of natural variation, durability, and versatility that no synthetic material has fully replicated. Whether you're renovating a bathroom, upgrading a kitchen backsplash, or adding an accent wall to a living room, understanding how marble wall tiles work in practice will help you make smarter design and purchasing decisions.
Understanding the Different Types of Marble Wall Tiles
Not all marble is the same. The stone is quarried from regions around the world, and each origin produces a distinct character in terms of color, veining pattern, and mineral composition. Knowing the differences helps you match the right marble to the right space.
Carrara marble comes from the Apuan Alps in Italy and is arguably the most widely used in wall tile applications. It features a white or blue-gray background with soft, feathery gray veining. Its relatively consistent patterning makes it easier to match across large surfaces, and its availability keeps costs more reasonable compared to rarer varieties.
Calacatta marble, also from Italy, is often confused with Carrara but is distinctly different. It has a brighter white base with bolder, more dramatic veining in gold or dark gray. Calacatta is less common and significantly more expensive, making it a statement material for focal walls or luxury bathrooms.
Emperador marble from Spain offers deep brown tones with white or beige veining. It works exceptionally well in spaces designed for warmth and richness, such as wine rooms, dark-themed bathrooms, or study walls.
Nero Marquina, a black marble from the Basque region of Spain, delivers sharp contrast and a dramatic look. It's frequently used in minimalist or contemporary interiors where a single bold surface anchors the entire room.
Choosing the Right Finish for Your Space
The finish applied to a marble tile changes how it looks, feels, and performs on a wall. There are four primary finishes to understand before making a selection.
- Polished: The most common finish for marble wall tiles. A polished surface reflects light and enhances the depth of veining, making colors appear more vivid. It's ideal for spaces where visual drama is the goal, such as feature walls or shower surrounds. The downside is that it shows water spots and fingerprints more easily.
- Honed: A matte or satin finish achieved by stopping short of the final polishing step. Honed marble has a softer, more natural look and is less likely to show marks from daily use. It's a popular choice for bathrooms and kitchen backsplashes where a more understated aesthetic is preferred.
- Brushed: A textured finish that gives the surface a slightly aged or rustic character. Brushed marble works well in transitional or industrial-style interiors where raw natural materials play a role.
- Leathered: Similar to brushed but with a more pronounced texture. Leathered marble has a tactile quality that makes it especially compelling on accent walls or fireplace surrounds, where touch as well as sight matters.
Best Applications for Marble Wall Tiles in the Home
Marble wall tiles are adaptable across many rooms, but each space presents its own set of requirements. Understanding where marble performs best — and where it requires extra attention — prevents costly mistakes.
Bathrooms
The bathroom is the most popular application for marble wall tiles, and for good reason. The stone's natural veining creates a spa-like atmosphere that other materials struggle to match. Full-height marble walls in a shower, a marble-clad feature wall behind a freestanding bathtub, or a marble backsplash above a vanity can transform a functional space into one that feels genuinely luxurious. When using marble in wet areas, sealing is essential. Marble is a porous material and will absorb water and soap residue if left unsealed, which leads to staining and potential structural damage over time.
Kitchen Backsplashes
A marble backsplash adds elegance to a kitchen without requiring a full renovation. White Carrara or Calacatta tiles behind a range or across the full width of the counter pair naturally with wood cabinetry, stainless steel appliances, and quartz or marble countertops. Smaller mosaic marble tiles in a herringbone or subway format are especially practical here — the grout lines provide additional grip, and the scale suits most kitchens without overwhelming the space. Oil and grease are common in kitchen environments, so honed marble with regular sealing is advisable over polished.
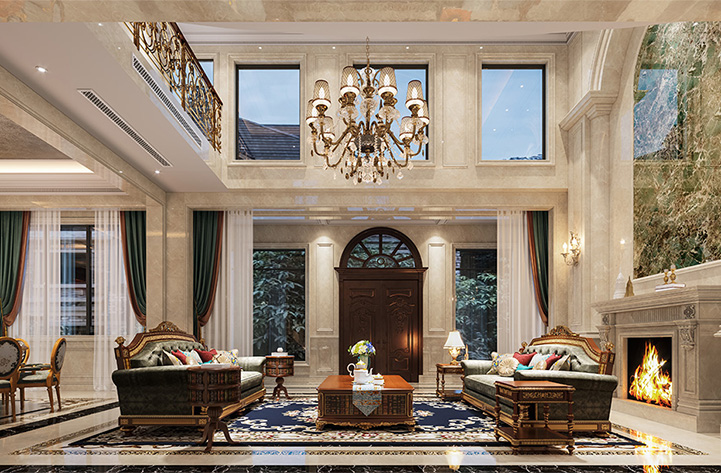
Living Room Accent Walls and Fireplaces
In living areas, marble wall tiles work best as a focused architectural statement rather than a room-wide treatment. A marble fireplace surround or a single feature wall in a book-matched pattern draws attention and provides a focal point. Book-matching — a technique where slabs or tiles are arranged so that their veining mirrors symmetrically — is one of the most visually striking ways to use marble and is especially effective in large-format tiles on living room walls.
Marble Wall Tile Sizes and Formats: A Practical Guide
The size and format of a marble tile affects both the installation process and the final visual result. Here is a comparison of the most common formats and where each works best.
| Format |
Common Size |
Best Application |
| Subway tile |
75 x 150 mm |
Kitchen backsplash, bathroom walls |
| Square mosaic |
25 x 25 mm (on mesh) |
Shower niches, decorative borders |
| Standard wall tile |
300 x 600 mm |
General bathroom and kitchen walls |
| Large format slab tile |
600 x 1200 mm+ |
Feature walls, fireplace surrounds |
| Herringbone mosaic |
Varies (on mesh) |
Backsplashes, powder room walls |
Larger tiles minimize grout lines, which creates a cleaner and more continuous look that highlights the natural veining. However, they are heavier and require a structurally sound wall substrate. Smaller mosaic formats allow more flexibility in shaping around architectural features and curved surfaces.
Installation Tips to Get Right the First Time
Marble is an unforgiving material during installation. Mistakes made at this stage are expensive to correct, and the weight and fragility of the stone mean preparation is critical.
- Prepare the substrate properly. The wall must be flat, clean, dry, and structurally sound. Any movement or flex in the substrate will eventually crack the tiles or open the grout joints. For wet areas, use a cement board or waterproof backer board rather than standard drywall.
- Use a white tile adhesive. Standard gray adhesive can show through thinner or translucent marble tiles, creating a murky appearance. A white polymer-modified adhesive maintains the clarity and brightness of light-colored marble.
- Lay out tiles before fixing them. Because marble has natural variation, it's worth arranging all the tiles on the floor before committing to placement. This lets you distribute the variation evenly and avoid clustering heavily veined tiles in one area or creating jarring transitions between tiles.
- Seal before and after grouting. Apply a penetrating stone sealer before grouting to prevent grout pigment from being absorbed into the marble surface. Seal again after the grout cures to protect the finished installation.
- Use unsanded or epoxy grout for tight joints. Marble tiles with minimal grout joints (1–2 mm) should be grouted with unsanded grout to avoid scratching the surface. Epoxy grout is highly stain-resistant and is particularly suitable for kitchen and wet room applications.
How to Maintain Marble Wall Tiles Without Damaging Them
Marble responds poorly to acidic cleaners. Products containing vinegar, lemon, or general-purpose bathroom cleaners with acidic formulas will etch the surface, dulling the finish and leaving permanent marks. The correct approach is to clean marble wall tiles with a pH-neutral stone cleaner and a soft cloth or microfiber mop. For daily maintenance in a bathroom, a quick wipe-down after showering to remove soap residue is all that's needed in most cases.
Resealing frequency depends on how much traffic and moisture the surface is exposed to. A bathroom shower wall in daily use should be resealed once a year. A kitchen backsplash that's wiped down regularly can go longer between sealings — typically every 18 to 24 months. To test whether resealing is needed, apply a few drops of water to the surface. If the water beads up, the seal is intact. If it absorbs into the stone within a minute or two, it's time to reseal.
Budgeting Realistically for Marble Wall Tiles
Marble wall tiles span a wide price range depending on origin, rarity, size, and finish. Entry-level Carrara subway tiles can be sourced for relatively modest sums per square meter, while large-format Calacatta or book-matched slabs can cost several times that amount, before factoring in installation. Professional installation adds to the total cost, and for large-format or book-matched installations, it's not an area to economize — a poorly installed marble wall is both visually and structurally problematic.
One practical strategy for managing costs is to use natural marble on focal surfaces — a shower wall, a vanity backsplash, or a fireplace surround — and complement it with high-quality porcelain tiles with a marble effect in areas where the material won't be closely scrutinized. Modern porcelain printing technology has produced convincing marble-look tiles that pair well with real stone when used thoughtfully, allowing for a premium look at a more controlled overall budget.


 English
 Français
 عربى
عربى italiano